Quality replacement dust cover rod, c-clip and torsion spring for AR style rifles. Changing them is very easy, but care must be taken to not lose the c-clips and to reassemble it correctly. Please read and follow the instructions below to get your new cover installed and ready to go: Push the hinge pin forward until you can see the little "c" clip, positioning it so the open end is toward you. Using small punches or a screw driver, very carefully push on each end of the clip until it pops off. It doesn't take much, so take it slow and easy. Force should not be required; the clip will be under the pin and easily removed. You can use tweezers, or a magnetic pickup, or carefully tilt the receiver until the clip comes out in your hand. Be careful it is small and is easily lost. Make note of the cover spring position. If you don't have a diagram, take a picture so you can put it back right later. Slide the hinge pin rearward, covering the spring with your hand so it is not lost when the tension is released. Keep working the rod rearward until it is clear. Go slow so you don't scratch your upper receiver. Installation is mostly reversing the above. An easy way to install the hinge pin spring is to position it with the short leg to the rear of the receiver, pointing up toward the ejection port. Push the hinge pin into the spring a bit. Grab the front part of the spring, lifting it away from the receiver and press the long leg down, allowing it to rest against the ejection port cover. Slide your hinge pin in the rest of the way. Line up the little slot on the hinge pin with the front wall of the hinge pin channel. Use the wall to slide the clip down against the pin and use a punch to push it into place. You'll hear an audible click as it engages properly.
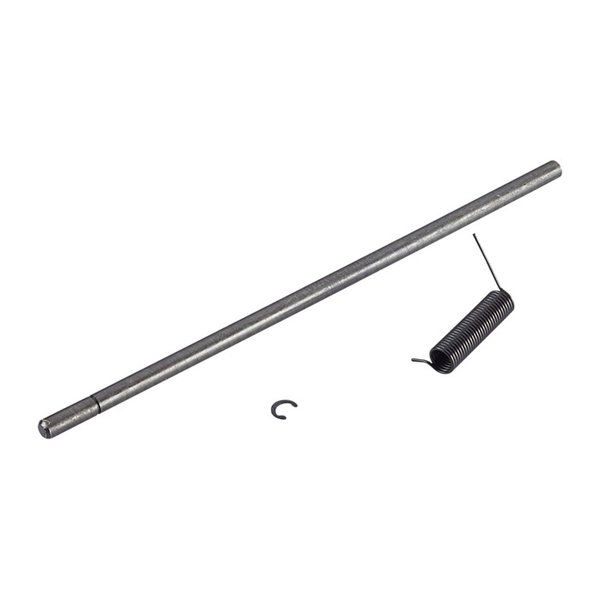
Kit di parti per copertura del portello di espulsione AR-15 di alta qualità
Questo kit comprende un'asta di copertura della polvere, un c-clip e una molla di torsione di qualità per fucili in stile AR. Cambiarli è molto semplice, ma è importante prestare attenzione a non perdere i c-clip e a rimontarli correttamente.
Si prega di seguire le istruzioni di seguito per installare il nuovo copertura e prepararlo per l'uso:
- Spingere il perno della cerniera in avanti fino a vedere il piccolo c-clip, posizionandolo in modo che l'estremità aperta sia rivolta verso di voi.
- Utilizzando punte piccole o un cacciavite, spingere molto delicatamente su ciascun lato del clip fino a farlo scattare via. Non ci vuole molto, quindi procedete con calma.
- Non è necessaria forza; il clip sarà sotto il perno e si rimuoverà facilmente. Potete usare delle pinzette, un attrezzo magnetico, o inclinare con cautela il ricevitore fino a far uscire il clip nella vostra mano. Fate attenzione, è piccolo e facilmente smarrito.
- Annotate la posizione della molla di copertura. Se non avete un diagramma, scattate una foto in modo da poterla riposizionare correttamente in seguito.
- Scivolate il perno della cerniera all'indietro, coprendo la molla con la mano in modo che non venga persa quando la tensione viene rilasciata.
- Continuate a lavorare l'asta all'indietro fino a che non è libera. Andate piano per non graffiare il vostro ricevitore superiore.
- L'installazione consiste principalmente nel fare l'opposto di quanto sopra. Un modo semplice per installare la molla del perno della cerniera è posizionarla con la gamba corta verso il retro del ricevitore, puntando verso il portello di espulsione.
- Spingere leggermente il perno della cerniera nella molla.
- Prendere la parte anteriore della molla, sollevandola lontano dal ricevitore e premere la gamba lunga verso il basso, permettendo che riposi contro la copertura del portello di espulsione. Scivolate il perno della cerniera fino in fondo.
- Allineate la piccola fessura sul perno della cerniera con la parete anteriore del canale del perno della cerniera. Utilizzate la parete per far scivolare il clip contro il perno e utilizzate un punzone per spingerlo in posizione. Sentirete un clic udibile quando si aggancia correttamente.